

We’ve had loads of compliments about the photos we take, and it really makes our day when we hear such lovely comments! So to return the favour we want to help you take better photos of your pets and improve your phoDOGraphy (sorry… not sorry)!
Every camera is different, so it is worth learning how to properly use your camera. We won’t be going through the basics of photography in this post, but at the end we will add some links to some good resources for general photography tips.
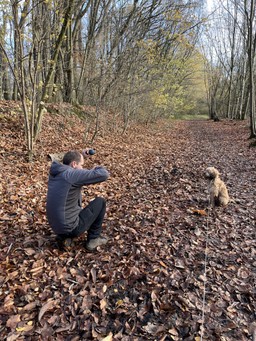
#1 Get down on their level and try different angles
Anyone can take a standard dog walk photo from standing height, looking down at the dog while it’s walking away from you. But it’s not the most flattering angle of the dog (nobody wants dog butt pictures!) and quite frankly, it’s boring! Getting in front of your dog, up close and down low, will make for a far more interesting photo of your dog. Getting low down will increase the space that your dog takes up and makes them the focal point of the photo.
If you have an iPhone (or another smartphone where the lens is at the top) then try turning the phone upside down to get even lower, right on the ground – this way you can snap a photo from the dog’s POV.


#2 Get their attention
Unless you’re photographing a super well-trained dog, it is unlikely that your pup will pose exactly how you want them to or even look at the camera on cue. One of the best ways to get a better photo of your dog is to have tricks for getting their attention. Dogs tend to get bored if you just repeatedly squeak a ball at them, so it’s a good idea to have a few different cues to keep them engaged.
Here are a few different methods we use when photographing dogs – it’s usually a team effort with Suze holding treats and toys while I snap away! Not all of these will work on every dog, but you can try a few and see what works:
- Using a clicker, or making clicking noises. Even the shutter noise on my camera is enough to grab the attention of some dogs!
- Making squeaky noises or whistling. From our experience this only works a couple of times before the dog gets bored and realises nothing happens when you make that noise – unless they are specifically trained to the sound of a whistle.
- Using a toy that they love. Again, this could be a squeaky toy or just one that they love. Though if they’re too obsessed with it, the toy can quickly become more of a distraction!
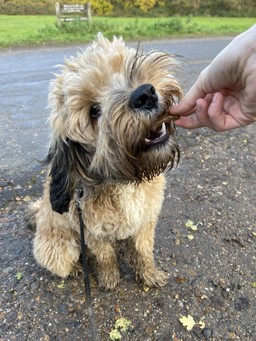
- Giving treats (always get the owner’s permission to give a dog treats and only give them ones that the owner has approved). We take our treat pouch by Dicky Bag everywhere we go! While it’s okay to use treats to engage the dog occasionally, don’t entice them with it just to make them look at you and then not actually give them the treat.. that’s just mean! Also, if you’re hoping to get fifty portraits then using treats might not be the best option, unless you want a chubby puppy…
- Say phrases excitedly like “What’s this?” Or “Who’s that?”. We’ve found this works 99% of the time – even gasping excitedly is enough to make most dogs prick up their ears!

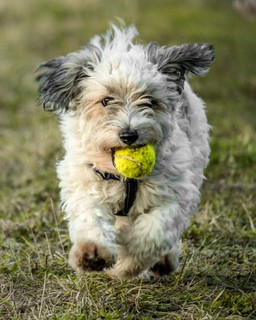
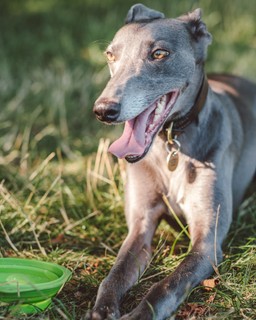
#3 Have fun and capture their personality
Play with your dog! Get down on the floor and mess around with them, play tug of war, chase them around and throw toys. Pictures of dogs sitting still, walking or sleeping are cute and fine but sometimes you want to show them doing something more fun. If your pup isn’t good at sitting still this is a great way to capture their personality and makes a portrait more interesting.
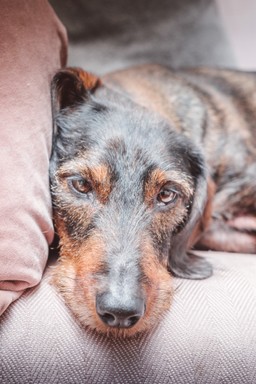
Is your pup a speedy boy? Get photos of him running around chasing after a ball or running with other dogs (use tips #6 & #7). Or maybe they’re a snoozy little ball of fluff – in which case lean into this and capture what they are like naturally, setting up a cosy nest for them to doze in for a cute pawtrait. Maybe they love a walk and are constantly on the trail for squirrels – snap a photo of them alert and doing what they naturally love to do.


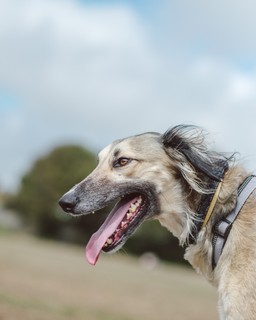
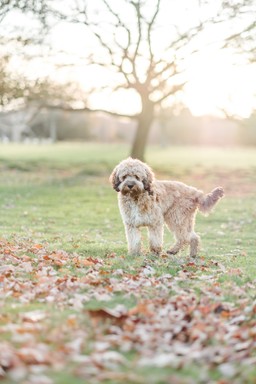
#4 Golden hour
This tip is just a general photography tip. The best light is often the hour before/after sunrise and sunset, when the sun is at its lowest and gives off a lovely soft golden glow. This is referred to as the golden hour. Many of our best photos were taken during this light – something about the glow, the colours and the ambience means you get stunning atmospheric photos every time.
#5 Pay your model
Just as you wouldn’t work for free, don’t expect your model to work for free and definitely don’t just pay them in exposure (#photographypun)! After you get a few good shots, chuck your dog a ball or let them run around and sniff that interesting stick. Dogs get distracted easily, so sometimes you need to paws and give them some time off. Give them lots of praise and at the end of the shoot, give them a treat! They’ll soon love to be photographed if they know they get a yummy snack at the end!
#6 Overshoot and use burst mode
Dogs are unpredictable, so it’s always worth taking more photos than you think. They can move or turn at any moment which might give you a blurry photo. In my experience it’s a good idea to keep clicking, take a few photos at a time and hope that at least one of those will be good! Most cameras and smartphones will have a ‘Burst’ mode which continuously snaps photos for as long as you hold the shutter. You can sort through the dozens of images afterwards and delete the ones that are out of focus, under exposed or unflattering.
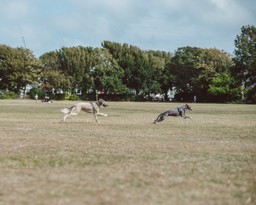
#7 High shutter speed for movement
In general it’s a good idea to use the quickest shutter speed you can for moving subjects and, as dogs aren’t very good at sitting still, this is very important! Even a slight movement on a slow shutter speed will cause your dog to look blurry in photos. If you have a camera where you can control the shutter speed (smartphones normally do a good job of keeping photos sharp) I suggest using a 1/250 shutter speed or faster when taking photos of pets and if they are running around you will a want a much faster speed to freeze them in action!

#8 Use what you have – you don’t need a super expensive camera!
Photography is an expensive hobby, trust me! Before you decide to buy a really expensive camera it is definitely worth trying to use what you have, whether that is a mobile phone or an old digital camera. You can take amazing photos with these, there are professional photographers who make a living just taking photos with their iPhones. Practice (see point #9), and learn what makes a good photo. Get a feeling of what sort of photos you like taking as different cameras and lenses have different purposes. If you like taking pawtraits, you’ll need a different lens to someone who wants to take action shots of their greyhound racing around the park.

#9 Practice
As a self-taught photographer, the best advice I can give about any sort of photography is to just get out there and start taking photos! Look at photos that you like and learn how to recreate them. Work out what different equipment does – how does a wide lens change the way a photo looks compared to a telescopic lens? Investigate what changing the aperture does. It takes time to learn, but once you know what everything does, it all becomes second nature. Even if you’re just using a smartphone for taking pictures, practice changing where you take the photo from i.e standing up vs down low. There are TONNES of resources on the internet (Youtube, Skillshare etc ) about how to learn photography. So many photographers are sharing their tips, and I’m learning new things all the time!
I would also recommend learning how to edit photos properly. There are also some amazing tools which are also worth getting to grips with. There are apps like VSCO and Snapped where you can add filters to your photos but personally I prefer Lightroom (both the mobile and desktop versions). You can download presets (which are settings that other people have created) to give your photos the same look, but I prefer to create my own. Editing is another skill entirely and it can take some time to get photos looking good without over editing!
#10 Invest in better gear
As I mentioned in tip #8, you don’t need expensive gear to get started. But once you decide to invest in photography it’s important to know what sort of camera to buy. Do lots of research and find a camera that is suitable for your needs. I recommend looking at mirrorless cameras over full frame DSLR – DSLRs can be very bulky and mirrorless cameras have come so far in matching their quality. If you’re out and about walking your dog you don’t want to lug a big camera around! I also recommend investing in an interchangeable lens camera so that you can switch the lenses – although this means you will need to buy lenses separately to the camera, but it also means you can buy different lenses for different purposes.
Resources
Peter McKinnon – Peter McKinnon is one of the biggest Youtube photographers out there and he’s made hundreds of videos with brilliant tips. Some of his videos might not be to everyone’s taste, but he really knows his stuff and I recommend watching his videos for inspiration and great tips. Start with his camera basics if you are new to photography –
Camera Basics 1 – Shutterspeed, ISO and Aperture
Camera Basics 2 – White balance & Focus Modes
Camera Basics 3 – RAW vs JPEG, Crop vs Full Frame and DSLR vs Mirrorless
Andy Biggar – Andy Biggar filmed a great video all about dog photography.
Benjamin Jaworskyj – This is one of the best explanations of shutter speed that I have found. It really clicked when I watched this, so I totally recommend checking it out!
Reggie Ballesteros – Reggie is one of my favourite photographers on Instagram. He uses Fuji cameras like me but he also creates posts with amazing tips. He has a fantastic way of explaining how he creates photos, and why he does certain things. Coincidentally he just made a post about dog photography!
The cameras we use
We get asked so often about what camera set up we have, so I thought this would be a great place to add a little more information about the equipment we use:
Fuji XT2 – this is our main camera and used for the bulk of our photos. This camera is small enough to carry around, but takes beautiful images. It is a little old now and there are few newer versions but this version works perfectly well. The colours that come out of the camera don’t really need editing – it is that good!
We also have a selection of lenses to go with this camera:
– Wide angle lens (Fuji 16mm f1.4) – this is a great lens for close ups of dogs as it has a very short focus length. It’s also great at getting shots of a whole scene, especially in low light.
– Landscape lens (Fuji 10-24mm f4) – this is the perfect lens for capturing landscapes. It’s not so great for pet photography, but you still can get wider shots with your pooch in the scene!
– Portrait lens (Fuji 56mm f1.2) – this tends to be my most used lens. It’s great for snapping photos of pets sitting down while they’re nice and still.
– Telescopic zoom lens (Fuji 55-200mm) – my primary use for this lens is to capture dogs that love zooming around. You can be positioned further away than usual and still attain lovely detailed shots of your dog having a run!
Fuji X100T – This is our secondary camera which Suze uses when I’m using the camera above. It’s much smaller, so it’s useful when walking around towns and for taking to cafes. It has a fixed lens so you don’t have to worry about changing lenses, which can make your life a lot easier but also means that if you want a close up photo, you have to physically move closer!
GoPro Hero 5 – This is our “Action” camera. It rarely gets used these days as it’s quite old now, but it’s a useful camera to take with us. We’ve used it in the past for taking timelapses, snapping pictures in water or for adventures where our cameras might get damaged.
DJI Spark Drone – We don’t take too many drone photos, but when we do it’s with this guy! Again it’s quite old now and there are better and smaller drones out there, but I can’t justify buying a newer one just yet – this one does well for the amount we use it.
Smartphone cameras – we’ve just upgraded our phones (well I upgraded mine and gave Suze my old one, much to her delight). Most of our stories and day-to-day photos are taken on these. If you’ve read some of our other posts you might know I’m an Apple fanboy, so there was really no alternative. I now have a Phone 12 Pro Max and Suze is using my older iPhone X.
If you found this post helpful, please support our blog by donating as little as £1 to our running costs! Thank-you!


We are Chris+Suze
Latest Posts


Dicky Treat bag
This treat bag has a small slot at the top for quick-to-grab treats, and we find it’s roomy enough for a lot of them! Your four-legged friends will thank you.


