Picture this: You’ve packed up your tiny home on wheels, put fresh sheets on the bed, washed up all your pots, pans and plates, and you hit the road for an adventure – and a warning light flashes up on your van dashboard. Sometimes we’re so focused on getting the home part of our van ready for a trip that we forget the other part is still a vehicle that needs constant checking and maintenance, like any other van or car. (For those interested: We have a Transporter T6 with a high roof). Chris loves finding a new gadget to optimise tasks in our lives, and when it comes to the van we’ve found more than a few handy tools to help us, and now you, be ready for whatever drama comes your way on the road! Read on for our top 5 gadgets that will make sure your adventure stays on course, and when you’re done check out the other van products we recommend!
Table of Contents
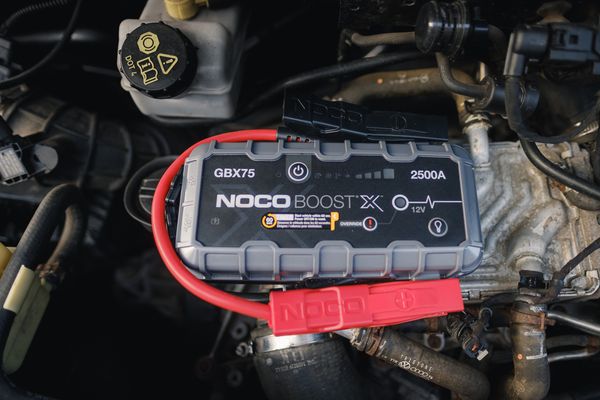
NOCO Boost GBX75 Portable Jumpstarter
That dreaded moment… You try to start your van but the engine doesn’t turn over – the starter battery is dead. This was our number one fear before we set off to drive the NC500 in Scotland as we knew there would be many parts of the journey where we’d drive through remote Scottish highlands, with nobody around to help us or jumpstart our van. We were so worried about being stranded for hours on end in the middle of nowhere, that we purchased the NOCO Boost GBX75 – a portable jumpstarter that can get us back on the road in no time! Check out our video below:
The NOCO Boost GBX75 is essentially a portable battery that has jump leads connected to the end. This powerful battery pack is rated to jumpstart 12v batteries in petrol vehicles up to 8.5 litre, or diesel engines up to 6.5 litre. It also has a few other features such as a powerful torch and USB sockets, which could come in very handy if you’re stranded somewhere at night and need to charge your phone to call for help!
It’s a tool that you don’t want to have to use, but when you do need it you’re VERY grateful to have it. We keep ours charged up and stowed in our van, just in case. While it holds its charge well, we always check that it’s fully charged before we take off for a big trip! We didn’t end up having to use ours in Scotland, though we’ve used it a handful of times since, and it’s incredibly simple. All you need to do is connect the clamps (positive to positive, negative to negative), power on the battery, wait for the light and then start the engine. It’s a real life-saver for keeping our travels on track! Read our full review post to find out why you need to add this to your van kit.
NOCO Genius 5 Battery Charger
Speaking of batteries, and NOCO products, we bought the NOCO Genius 5 in the hopes of preventing our need to jumpstart the van in the first place. We’re not always out travelling in our home on wheels, as our job as full time house and pet sitters keeps us busy, so sometimes our van can sit for a week or longer on a driveway and the battery begins to drain. Ultimately the battery may drain enough that our van won’t start.
The NOCO Genius 5 is designed for 6v & 12v batteries up to 120Ah and will safely charge your battery at 5amps. Like the NOCO jumpstarter, the device is simple to use: You connect the cables to the battery (positive to postitive, negative to a ground point) and plug the other end into mains electric. Once powered on, you select the battery type you want to charge and leave it to do its thing! It can take a few hours to fully charge, but the LED indicators on the NOCO Genius 5 allow you to keep an eye on its progress. Once it’s finished charging the device will go into maintenance mode, keeping your battery in tip-top condition. (There is also a repair mode to try and repair old, damaged or sulphated batteries. Thankfully we haven’t had to try this yet, but we’ve heard it works well!)
To make things even simpler, we’ve replaced the clamp connector that attaches directly to the van battery with a 12v plug adapter. This means we can plug the NOCO Genius 5 into the 12v socket on our dashboard and leave it to charge, while keeping the equipment inside in our van with no need to pop the bonnet and physically connect to the battery. We’ve found this especially useful when we’re hooked up to electric on a campsite, but we want to head out for a walk! We simply plug it in, lock the van, and head out on our hike, knowing that our van will be charged and ready to go upon our return. Having this set up is a definitely bonus as it doesn’t interrupt our travels, and if you’re going to do this too just make sure that your 12v socket is permanently live like ours.
Carista OBD2 Adapter
The Carista OBD2 Adapter is a small device that plugs into the OBD2 port on your van. After downloading the accompanying app and connecting via BlueTooth you can reveal all sorts of diagnostics and customisations for your vehicle.
We’re by no means experts when it comes to mechanics, but having the Carista means we don’t need to be! This device is easy to use and can quickly diagnose most faults in your van. On one journey, driving alongside the rolling heathland of Dartmoor, an engine management light flashed up on our dashboard. Worried that we were going to have to cut our hiking trip short, and spend £1000s on a repair, we plugged in the Carista to tell us the fault. We were soon breathing a sigh of relief as it showed us that one of the glow plugs had failed and needed changing. As this was not something that needed an immediate fix, we were relieved to be able to carry on our trip with ease before finding a garage when we’d finished exploring a week later.
The Carista can also be used to perform simple customisations to your vehicle. These range from changing the length of time the headlights stay on after you’ve locked the vehicle, to adding a sound when you lock its doors. One of the most popular customisations for VW Transporter owners is to add a large digital speedometer display on the small screen behind the steering wheel. A VW by default only shows a small digital speedometer in KM/H, which isn’t very useful in the UK!
Lastly, we love that the Carista can also display live data while you’re driving. If you need to diagnose a fault that only happens while your van is in motion – such as how the engine performs, the battery voltage or the wheel speed while moving – then you can have a passenger run the app while you drive to find out what the fault is. For us, living full time in our home on wheels, having the Carista is worth every penny for the peace of mind it gives us – knowing we can easily diagnose vehicle faults wherever we are!
It’s worth noting that the Carista only supports certain makes of van – check if your vehicle is compatible here.
TyrePal Tyre Pressure Monitoring System
Keeping tyres on a vehicle at the correct pressure is incredibly important – nobody wants a blow out on the motorway, and especially not when you’re on a fun adventure! Beyond that, maintaining the correct tyre pressure makes driving smoother and more economical. As part of good vehicle maintenance you should check your tyre pressures regularly, but what if something happens in between those check-ups? That’s where the TyrePal steps in.
The TyrePal is a tyre pressure monitoring system that consists of individual sensors for each tyre and a small, solar-powered monitor. We love that this monitor fits in the palm of our hand, meaning it doesn’t take up valuable van space – we keep ours out on our dashboard at all times for easy solar charging! The sensors are individually labelled so you can fit them to the correct tyre, replacing the dust caps on each one. The sensors automatically sync with the monitor and all you need to do is set the range for the tyre pressures that are suitable for your vehicle – and you’re done! The monitor allows you to check the pressure for each tyre in realtime, as well as their temperatures. The monitor will alert you if the pressure goes outside of the range you’ve set, so you’ll know as soon as there’s an issue. This is an incredibly valuable function for someone like Chris, who thinks that every small noise in the van is a serious issue! The TyrePal gives us peace of mind that the health and performance of our van’s tyres are being monitored at all times on our travels.
A lot of vehicles will alert you if the tyre pressure is low, but often this is done by using ‘indirect’ monitoring – this generally means that it measures the wheel speed. A low pressure tyre will rotate faster than it should, and the vehicle will use this information to alert the driver. Although useful, this is less responsive than the TyrePal and often won’t show you which tyre it is that needs adjusting. Even if you have this ‘indirect’ monitoring, the TyrePal is much more responsive so you can amend any tyre pressure issues quickly, meaning you’re back to adventuring quicker! Which brings us to…
Ring Automotive Tyre Inflator
If you do need to adjust your van’s tyre pressures, this nifty little device will save you lots of hassle on the road! We originally bought the Ring Automotive tyre inflator for the Ford Fiesta we owned before buying our van, as we had a slow leak in one of the tyres that meant every few months or so the low pressure indicator lit up on our dashboard. We could often find a petrol station with an air pump to top up the tyre, but since then many petrol stations have started charging to use these. As we spend most of our time in remote countryside areas as we explore the UK, we decided that it would be worthwhile to add a tyre inflator to our vehicle kit so we can easily inflate our tyres to the correct pressure without the need to find a petrol station.
This tyre inflator is so easy to use that we’re always done within minutes! The power cable plugs into the 12v socket on the dashboard, a dial on the front allows you to set the desired pressure, and with a press of a button the tyre starts filling up. The digital display shows the inflation progress and the inflator automatically stops when it reaches the correct pressure. This piece of kit has come in handy on countless trips as we travel the UK for our pet sitting adventures, and it’s so small – with it’s own zip-up travel case – that it easily stows away underneath a seat in the cab for quick access when we need it.
If you’ve found this post helpful, and would like to see more of the items we use in our van, head to our Products We Recommend page.

We are Chris+Suze
Latest Posts

Screwdriver set
You never know when a simple screwdriver will come in handy! All the driving you do in your camper can mean the living space needs a tweak or two from time to time (especially if, like us, you spend a lot of time navigating potholes in the UK!) This 7 piece set means we always have the right size for the job.

WerkFix Spanner Set
This 15 piece spanner set comes in handy for any unexpected repairs or adjustments while we’re on the road! We store ours in the garage space of our van for easy access.
